Craft & Cork >> Winemaking

Degassing: Removing Those Pesky Bubbles!
Have you ever wondered where the unwanted bubbles in your craft wine came from or how to get rid of them? Experienced craft winemakers may already know the various tricks for reducing bubbles to unperceivable levels in craft wine. For those who are new to craft winemaking, in this week’s Craft & Cork I will teach you everything you need to know about these bubbles, including methods for removing them. I will also provide tips to help you produce a wine that is softer and smoother on the palate.
What are the bubbles?
 During primary fermentation, the yeast that you added to the juice will metabolize the sugar, therein producing CO2 (carbon dioxide) and alcohol. It is this production of carbon dioxide that results in the foam that you might see during fermentation, or when the wine is being agitated during the stirring or racking processes. Although carbon dioxide adds desirable attributes to sparkling wines, it is not desirable in finished wines that are meant to be still. It does, however, still serve a purpose during making. Since CO2 is heavier than oxygen it can be used to blanket the surface of the wine keeping oxygen at bay.
The amount of CO2 contained in the wine is primarily affected by the temperature at which the wine is fermented. Lower fermentation temperatures will result in more CO2 being dissolved into the wine. Therefore, if you are fermenting your white wine at 15 degrees Celsius versus 25 degrees Celsius, your wine will require more effort to remove the CO2 during the degassing process, ensuring those pesky bubbles are eliminated.
Degassing Methods
The following table highlights 3 of the most common degassing methods used to remove CO2 from the wine for craft winemakers and highlights the benefits and disadvantages of each method.
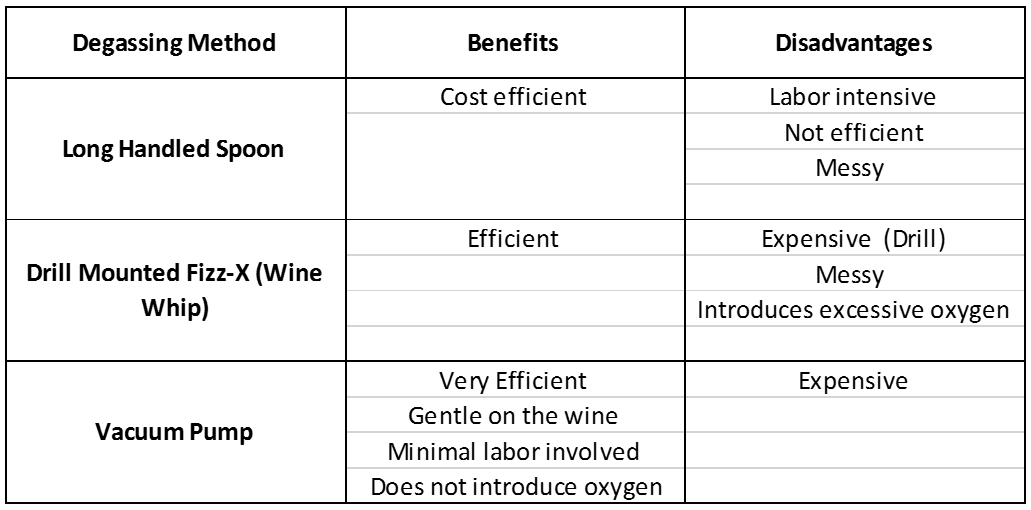
- Long handled spoon – A total time of approximately 10 minutes of stirring is required to thoroughly degas a 23L (6 US Gal) wine kit.
 Drill mounted Fizz-X (wine whip) – This method requires a total degassing time of around 5 minutes and requires the use of a 12V drill as well as a wine whip which can be purchased from your local winemaking store.
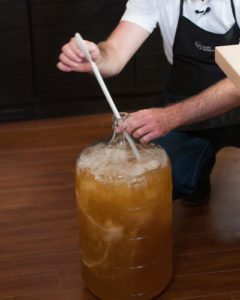
- Vacuum pump – This method is by far the most efficient for removing CO2 from the wine. It requires the use of a single stage vacuum pump to create a negative pressure of around -18 PSI. By holding this negative pressure for around 3-5 minutes, all perceivable CO2 will be removed from the wine without introducing any oxygen. This will help maintain aromatic freshness and produce a wine that has a soft, round palate. It is important to note that this form of degassing can only be performed in a glass carboy and the carboy MUST be filled above the shoulders to reduce the chances of the carboy imploding.
The number of topics that can be discussed when it comes to degassing is endless, so I encourage you to post comments and questions at the end of this blog or contact me for more information on each method.
 Chris Holman has been making wine professionally since 2006, which has led him to work in regions such as the Niagara Peninsula, Okanagan Valley, McLaren Vale South Australia, and Tasmania. Chris earned a 2 year diploma at Niagara College in Winemaking and Viticulture in 2008 and more recently he received a 4 year B.Sc degree majoring in Oenology and Viticulture at Brock University in 2015. His academic achievements in addition to his technical winemaking experience will allow him to provide our customers with excellent technical support and new ideas, helping them continue to make excellent wines.
Hey Chris,
Hope all is well.
I have a question in regards to stainless steel fermenters and multi batches at the same time. I am considering getting a 500 litre tank with a floating lid and using 10 to 20 kits at the same time. any comments or suggestions with be appreciated.
Hello Russ,
Using variable lid tanks for our kits is no problem at all! The first step would be to add the correct amount of warm water (20-25°C/68-77°F) to the tank along with the bentonite. The amount of water to be added will depend on the kit that you are making. Follow these guidelines for water to be added for each of these kits. Orchard Breezin -19L / Grand Cru – 13L / Cru International – 11L / Cru Select – 7L / EnPrimeur Winery Series – Whites – 5L – (Reds – Wet Skins – 7L) (Reds – Dried Skins – 5L).
If you are making 10 kits, you would multiply the volume of water for the specified kit by 10. Once the water is added along with the bentonite you will need to mix well with a drill mounted stirring or long handled spoon. Now you will add the juice from each of your kits along with any grapeskins, oak, or elderflowers. Mix the tank one more time with your stirring device for 1 minute. Wait until the juice stops churning in the tank and then sprinkle the yeast that came with your kit. After your fermentation is complete you can follow the instructions included in your kits.
Hope that helps. Let us know how the wine turns out! 🙂
I was told that that a wine vacuum pump as what you use for a bottle is cheap and effective way…thoughts?
https://m.youtube.com/watch?v=ZjL80hXkHdI
Please provide more info about vacuum pumps, i.e. where they can be purchased and the approx cost. Thank you.
Where is the best one and where to buy a vacuum pump system?
Have the same request as Lisa Holmes.Thanks
Hello Michael,
Here is the parts list we have put together:
Below is the parts list we have put together.
Brass Fittings & Hose (Can be purchased at local hardware store)
2- 5/16’’ ball valves (blue handles although any color would be ok)
1 – 5/16’’ 90 degree elbow
1 – 5/16’’ female fitting barbed
2 – 5/16’’ male barbed fittings
2 – 1/4’’ male barbed fittings
1 – 1/4’’ t- fitting
1 – vacuum gauge
5/16’’ reinforced air hose tubing to fit between fittings (36” (3 feet) of length is adequate)
9 – Hose clamps
Vacuum Chamber (Purchased from science store at local College or University)
1 glass container to catch overflow (500mL erlenmeyer flask with vacuum attachment)
Bungs (Purchased from RJS or local winemaking supply distributor)
Rubber bung #10 with hole (For vacuum chamber)
Rubber bung #6.5 with hole (For carboy)
Vacuum Pump (Purchased from Amazon)
https://www.amazon.com/TMS-Single-stage-Rotary-Vacuum-Refrigerant/dp/B00BXMRP4I
Let us know how your wine turns out after the vacuum.
Hello Lisa,
Below is the parts list we have put together.
Brass Fittings & Hose (Can be purchased at local hardware store)
2- 5/16’’ ball valves (blue handles although any color would be ok)
1 – 5/16’’ 90 degree elbow
1 – 5/16’’ female fitting barbed
2 – 5/16’’ male barbed fittings
2 – 1/4’’ male barbed fittings
1 – 1/4’’ t- fitting
1 – vacuum gauge
5/16’’ reinforced air hose tubing to fit between fittings (36” (3 feet) of length is adequate)
9 – Hose clamps
Vacuum Chamber (Purchased from science store at local College or University)
1 glass container to catch overflow (500mL erlenmeyer flask with vacuum attachment)
Bungs (Purchased from RJS or local winemaking supply distributor)
Rubber bung #10 with hole (For vacuum chamber)
Rubber bung #6.5 with hole (For carboy)
Vacuum Pump (Purchased from Amazon)
https://www.amazon.com/TMS-Single-stage-Rotary-Vacuum-Refrigerant/dp/B00BXMRP4I
Hope that helps. Let us know how your wine turns out!
How long should I degass using a vacuum pump. If I give it 30-40 pumps, gas in the form of small bubbles will come out for a while. If I give it additional pumps more gas will continue to come out. You can keep doing this and the gas coming out seems to be never ending. The bubbles eventually get larger but still come out of the wine. When would I stop this process?
Hello Rick,
If you are using a hand operated vacuum pump we recommend that you pump the wine for a total of 5 minutes. This will remove all of the perceivable CO2 from your wine. In order to remove absolutely all of the CO2 from the wine it will take 20-30 minutes of constant pumping which is not fun! The goal of degassing is to remove the CO2 in the wine to non-perceivable levels which 5 minutes of pumping should accomplish. Taste the wine before and after degassing for this 5 minutes to ensure that the perceivable CO2 has been removed.
Hope that helps. Let us know how your wine turns out!
wound up with an old brake bleeding vacuum pump and now use it in all my winemaking., pulling negative 30 inches of mercury. What a difference in the taste and mellowness of my wines.
Hello Earl,
Thanks for letting us know about your success with the vacuum pump when making our wines. Feel free to pass along any other of your winemaking successes.
I have been using the long handle to degas my wine for the past 26 years and was not aware that a vacuuum degasser was availuable. Thanks
Hello Michael,
If you have been having success with the manual stirring degassing method then there is nothing wrong with continuing this method. After all, it is the most economically efficient method of degassing a single batch of wine! Below is the parts list however that can help you if you were to choose to adopt the vacuum method.
Brass Fittings & Hose (Can be purchased at local hardware store)
2- 5/16’’ ball valves (blue handles although any color would be ok)
1 – 5/16’’ 90 degree elbow
1 – 5/16’’ female fitting barbed
2 – 5/16’’ male barbed fittings
2 – 1/4’’ male barbed fittings
1 – 1/4’’ t- fitting
1 – vacuum gauge
5/16’’ reinforced air hose tubing to fit between fittings (36” (3 feet) of length is adequate)
9 – Hose clamps
Vacuum Chamber (Purchased from science store at local College or University)
1 glass container to catch overflow (500mL erlenmeyer flask with vacuum attachment)
Bungs (Purchased from RJS or local winemaking supply distributor)
Rubber bung #10 with hole (For vacuum chamber)
Rubber bung #6.5 with hole (For carboy)
Vacuum Pump (Purchased from Amazon)
https://www.amazon.com/TMS-Single-stage-Rotary-Vacuum-Refrigerant/dp/B00BXMRP4I
Hope that helps. Let us know how your wine turns out!
I personally like fermenting in the primary at 17 – 18 degrees celsius. Higher than that tends to rush the process. I then raise the temperature to 25 – 27 degrees celsius for 7 – 14 days. This ensures complete fermentation. In addition, a high percentage of the solids drops to the bottom leaving the wine semi-opaque. After transferring there is very little if any CO2 left in the wine and the clearing oftimes is complete in just a few days.
Hello Dave,
Fermenting at 17-18 degrees Celsius should not be a problem at all, as long as you are able to maintain this temperature without fluctuations for the first 7 days. It is also a good winemaking practice to warm the fermentation up towards the end to assist in a complete fermentation. This is typically what most commercial winemakers will do so keep this up. The bentonite added at the beginning of the primary fermentation assists in the clearing process towards the end of the fermentation and initiates the protein stabilization process. This helps the kieselsol and chitosan work more efficiently producing a wine that is clear and protein stable. Keep up the great work!!
When degassing the wine, can I degass for at least 5 minutes with a drill and then wait a few days and de gas again?
Will I harm the wine
From Chris Holman:
Hello Rick,
Thank you very much for your inquiry.
When you degas your wine it is best to do all your degassing all at once. Degassing should be completed for between 3-5 minutes using your drill mounted fizz-x tool before adding your clearing and stabilizing agents. By degassing the wine a few days after the initial degassing you will only be introducing oxygen to the wine which will reduce the amount of sulfite in the wine needed to protect against oxidation and microbial spoilage. Also, ensure that your stabilizing agents (2A-Sulfite)(2B-Sorbate) are dissolved in 1 cup of wine before adding to carboy. Gently mix this solution into your carboy for 30 seconds using your long handled spoon to ensure homogenization. Please contact us at 1 800 663 0954 or rjsinfo@cbrands.com for further assistance.
Thanks!